Wednesday, 7 December 2011

Time for Another Update

Well, considering the Alloa brief I have moved on quite sufficiently as I am now 3 brick panels into my final piece out of the 5 that I have decided to make for my sample piece to illustrate the brick effect which will be displayed upon a window within the campus.

The Process...


After finding an interesting combination of two glass maquettes containing both stringers and broken patterned glass, I decided to experiment with this idea but cut the layering of glass down to 2 panels instead of the initial 3 and attempt to put the glass panels in with the stringers and broken glass in all at once. This would then save me time as time is a big constraint on this project and working with glass, a lot of preparation is needed in order for the glass to be ready and fully fused. After speaking to one of the lecturers I was advised to experiment with a smaller panels as I am trying to recreate a brick effect and initially in my earlier maquettes the sizing of the panels were larger so again I took this advice on board and sourced a further 14 panels of glass which gave me 4 panels for experiments and a further 10 for the final piece as 2 panels are needed to make 1 brick effect.

The Prep


Different coloured stringers were sourced from the college and broken to size and placed carefully on top of one glass panel. From this, I then broke up a slightly patterned glass using a hammer and selected pieces which were then placed upon another panel of glass and then put on top of the remainder. The glass is then left to its own devices for the next day as the glass fuses together and then carefully checked once this process is complete. For my first maquette I used patterned glass sourced from the college to create the broken glass effect but this did not work out and produce the sharp effect I was looking for but instead created a melted edge effect which I later found out was down to there being an incompatibility within the two glasses.


As you can see, the edges aren't as defined as they were in my previous maquette using broken glass and this was because the glass used in the previous one was from A&J Glazing which must have a stronger resistance in terms of the strength of the glass. I am somewhat glad that this didn't turn out according to plan as this whole project has been a learning curve as I have never experimented with glass before so this was dealt with and new glass was sourced to avoid this happening again. A positive outcome also came from this experiment as I learned that due to resizing the glass, 2 pannels could then fit into the kiln to be fused, and also that I could fuse the stringers in with with the other layer of broken glass in at the one time without it breaking.

Moving On...


After this experiment, I then continued to create my final piece.


The pictures above illustrate a part of the process that goes into making these panels alongwith the panels that have been created to date. The panels are to be photoshoped into the chosen window at the Alloa campus to create the right effect of how it would look in situ.

Preperation for Photoshop

Today I visited the Alloa campus again to refamiliarise myself with the surroundings and the chosen space that my art work would exist in. I took measurements of the windows and took the appropriate photos with the help of Kara Day to ensure I had suitable photos to be used in the editing process.


More pictures and details to come!


Monday, 5 December 2011

FLEX

Another Monday morning has arrived and another few maquettes have been produced in relation to the sculpture class. Although this class requires no conceptual development or attachment, I still find myself relating certain materials and ideas to the word at hand rather than experimenting freely with a wide variety of materials, so I decided to make a conscious effort to use materials that would be seen as being more frigid than flexible in todays class.


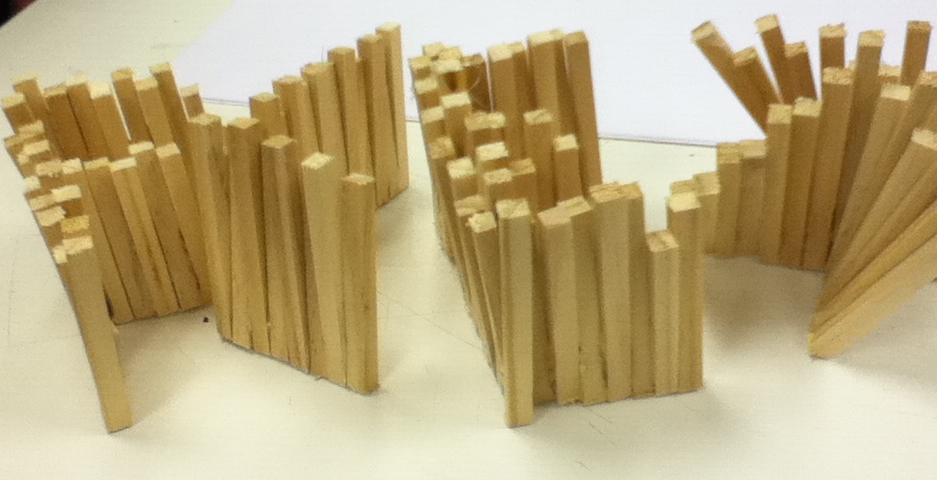
This was created by cutting varying lengths of strips of wood using the Bandsaw and gluing together in such a way that I recreated and developed from the pixelated style that I created for the letter 'X' in an earlier experiment. I done this by gluing the ends then edging out the tops of each strip to create this effect which i find works well and could be developed further into a final piece by using larger strips of wood alongside wood glue to create this at a larger scale. I particularly like the way it is consistantly interesting from all angles which is essential to any 3D work. From this, I decided to experiment one step further by using the vacuum extractor for one of the letters just to see the outcome and determine whether or not any potential could evolve from this technique.


Due to the height of the lettering, this technique was always going to be done at a chance as the plastic needs to be blown up before being vacuumed in order for the height to be extracted. Although this experiment didn't turn out particularly well, I like the graffiti style it has created as the plastic has been strained at each corner of the lettering nonetheless creating an interesting look.

In addition to this, i decided to experiment with Styrofoam and cut out block lettering with precision and accuracy using the bandsaw to achieve a very defined style, once again a material that i wouldnt instinctively associate with the word 'FLEX'.


Composition wise, I played around with varying styles but for this one shown above, i tried to recreate a regimented look as well as maintaing a disarranged manner by lowing certain letters. I think that by using such simple lettering like this composition would be essential to providing an intriguing 3D artwork. For the next composition i wanted to move away from a 'controlled' aesthetic in order to create a scattered arrangement.


I quite like the look of this maquette, but decided to adapt it further by cutting down the height of the 'L' and 'X' to create a deranged effect from the varying heights.


After i had cut down the size of both letters i reverted back to a rigid composition which highlights the variation of the size in lettering but for experimental purposes decided to look into the scattered effect again now that adaptions had been made in relation to the lettering.


I find that this works well, and think if there was a stack of random styrofoam shapes underneath this maquette it could have potential as a final composition as i feel anything other than sharp shapes would be too diverse for it to look visually pleasing.

More Experiments to come alongside final piece!

Thursday, 1 December 2011

Additonally...

In other news, I have also been undergoing a sculpture class as part of the 8 week tutorial sessions which was previously video.
In this class, I was given the task of choosing a word and then manipulating and producing maquettes and of course a final piece of the chosen word at hand.

I decided to choose the word Flex as it instinctively stood out for me and gave me the most ideas in terms of materials and a final outcome.


In the above maquette I manipulated wire using a mixture of straight and curvacious formations in order to create a disorderly effect where the viewer has to carefully seek out the lettering.


From another viewpoint.


For the second maquette I decided to use mainly wood with wire to create a simple but effective distinctive style for each letter. The 'F' was created by breaking up wooden sticks and simply rearranging them together again in a disarranged manner using the glue gun. The 'L' was made by using sheets of soft wood to create a a linear form. For the 'E' I decided to use wire to add to the combination of wood and simply reformed the wire using curves to create the simple lettering. Finally, for the 'X' I decided to use wooden blocks and glue then together in a pixellated manner to again add to the effect of a wide range of text styles. Personally, I find that this one works quite well and has a quirky appeal.


Close up of 'FL'


Close up of 'EX'


Created a simple experiment using card to create simple shapely form. The pieces of card were then glued down to hold into place and pictured from different angles. For this experiment I only looked at the letters of L and E and didn't find the aesthetics to be upto standard and dismissed this idea as I didn't feel it had as much potential as the others so far in terms of manipulation.


Birds eye view.


Another experiment created using wire then wrapped in string to create a natural loose formation. I particularly like the style of the lettering as I tried to incorporate my own handwriting as it tends to have flexible tendancies in terms of the F and L lettering. I think that the font adds to the piece and the string creates an interesting effect. This one is a possibility to be taken further as I find their to be potential at a larger scale.


More pictures will be following soon of more experimental ideas and maquettes!

A See-Through Perspective...

Since my last post, I have moved on a great deal and now have a concept which will more than likely change once the final piece has been made and reflected upon.

Statement of Intent-
From looking at the Alloa campus, I was automatically drawn to the vast amount of glass used in the building creating a very contemporary look as well as giving off the appeal of a blank canvas. Bearing this in mind I wanted to add subtle colour and add to the original features of the building while also looking into the towns past. As I explored into Alloa’s history, I found out that the area was well known for glass making which again fits in well with the route I was beginning to consider.
Relating to the idea of using glass, brought me onto the thought of it representing opportunities as unlike mirrors, glass enables the viewer to shift between looking at it, and looking through it, similar to the mentality of someone focusing on their future potential by studying at the college. Glass as a material can symbolise the formation of realisations that students go through whilst they adapt to further learning, by allowing a clear image of their aspirations to be ‘seen’.
I want to use glass as a building technique and create the appeal of something being fragile, taking a stance and representing a dense structure within the campus. I want the piece to merge in with original features and imitate its surroundings just as glass reflects what is before it. In addition to this, I want the piece to represent the steps that are being taken as Alloa as a town, and the students that attend the campus to expanding themselves and by using and manipulating glass, I believe an artwork could be constructed which signifies the past, and of course is notable for the campus' future and the students who are furthering themselves within it.
Fundamentally, I want to create a glass structure which epitomises potential and prospects for the area and the students to relate to. I want to signify that a structure can be created which idolises fragility, but on closer inspection denotes a formation. The idea of focusing on the potential and prospects which have been created through the opening of the new campus will create an uplifting and inspirational piece that will hopefully compliment the themes that are carried on throughout the building.

Moving On...
After deciding to use glass as my starting point in relation to my concept, I decided to move forward by creating 'glass bricks' more in the sense of pattern and size rather than creating 3D objects. I felt that the idea of a brick pattern was well suited towards the idea I am trying to portray with relation to breaking barriers for Alloa and everything that this new campus stands. In addition to this, the idea of a brick wall coming before us in our learning environment, can be seen as being  defeated and conquered as well as seen through by the decision to use glass to create this effect. I felt that this would be an inspirational subject matter as well as aesthetically pleasing.
So far, I decided to experiment with two completely different approaches, one using glass stringers and the other with a broken glass effect.
Here are some pictures of both;


 After I had make two very different experimental glassworks, when seeking to find new ideas I placed one on top of the other, and found the outcome to be very interesting with a lot of potential. The combination of both fulfilled the need for colour and also a broken glass effect and found it to be visually effective as well as suitable to my concept.

The Combination...